Developing a Website from Scratch
HTML Lesson 9: Developing a Website from Scratch
Developing a website from scratch yourself
Development of the structure
Today, many website development tools have emerged, including specialized portals designed for building websites based on provided templates, content management systems, and other similar tools. These systems naturally facilitate the resource creation process. However, for educational purposes, it’s necessary to learn how to create a website from scratch. For this, we’ll choose a simple design that uses a frame structure to organize the website’s page interface.
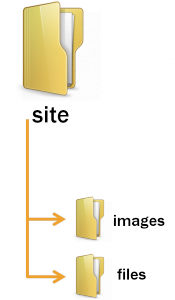
To begin, you need to prepare a working directory and the main necessary files. Notepad++It
is recommended for working with files. Create a working directory (named site, for example) and arrange two folders within it, as shown in the figure:
In the main directory, create and save HTML files with the following names:
- index.html
- header.html
- menu.html
- titul.html
- footer.html
- chapter 1.html
Open the main executable file, index.html (the layout file), and add the code to organize the frame structure:
<!DOCTYPE html>
<html lang="en">
<head>
    <meta charset="UTF-8">
    <meta name="viewport" content="width=device-width, initial-scale=1.0">
    <title>Modern Layout</title>
    <style>
        * {
            box-sizing: border-box;
            margin: 0;
            padding: 0;
        }
        body {
            display: grid;
            grid-template-rows: 10vh 80vh 10vh;
            height: 100vh;
            font-family: sans-serif;
        }
        .container {
            display: grid;
            grid-template-columns: 20% 80%;
            height: 100%;
        }
        iframe {
            width: 100%;
            height: 100%;
            border: none;
        }
    </style>
</head>
<body>

    <iframe src="header.html" title="Header"></iframe>

    <div class="container">
        <iframe src="menu.html" title="Navigation Menu"></iframe>
        <iframe src="titul.html" title="Main Content" name="main"></iframe>
    </div>

    <iframe src="footer.html" title="Footer"></iframe>

</body>
</html>
Then you need to add the code to the web pages intended for this purpose:
- header.html
<!DOCTYPE html>
<html lang="en">
<head>
    <meta charset="UTF-8">
    <meta name="viewport" content="width=device-width, initial-scale=1.0">
    <title>Document Title</title>
</head>
<body>
    <header>
        <h1>Logo/Header</h1>
    </header>
</body>
</html>- menu.html
<!DOCTYPE html>
<html lang="en">
<head>
    <meta charset="UTF-8">
    <meta name="viewport" content="width=device-width, initial-scale=1.0">
    <title>Menu</title>
</head>
<body>
    <h1>Menu</h1>
</body>
</html>- titul.html
<!DOCTYPE html>
<html lang="en">
<head>
    <meta charset="UTF-8">
    <meta name="viewport" content="width=device-width, initial-scale=1.0">
    <title>Description</title>
</head>
<body>
    <h1>Description</h1>
</body>
</html>- footer.html
<!DOCTYPE html>
<html lang="en">
<head>
    <meta charset="UTF-8">
    <meta name="viewport" content="width=device-width, initial-scale=1.0">
    <title>Copyright</title>
</head>
<body>
    <h1>Copyright</h1>
</body>
</html>- chapter 1.html
<!DOCTYPE html>
<html lang="en">
<head>
    <meta charset="UTF-8">
    <meta name="viewport" content="width=device-width, initial-scale=1.0">
    <title>Chapter 1</title>
</head>
<body>
    <header>
        <h1>Chapter 1</h1>
    </header>
    <main>
        <p>Your content starts here...</p>
    </main>
</body>
</html>
Organizing the work of hyperlinks in the menu
For hyperlinks in the menu.html file to work correctly, namely, for executable files to open in the frame to the right of the menu, two steps must be completed:
In the frame structure file, add a name for the frame in which we are going to open web pages in the menu:
<iframe src="title.html" name="main" title="Main Content"></iframe>We’ve already done this when creating the frame structure. The frame we need is called main.
Add the hyperlink code to the menu.html file:
<!DOCTYPE html>
<html lang="en">
<head>
  <meta charset="UTF-8">
  <meta name="viewport" content="width=device-width, initial-scale=1.0">
  <title>Menu</title>
</head>
<body>
  <header>
    <h1>Menu</h1>
  </header>
  <nav aria-label="Chapter Navigation">
    <ul>
      <li><a href="chlava1.html" target="main" rel="noopener">Chapter 1</a></li>
      <li><a href="chlava2.html" target="main" rel="noopener">Chapter 2</a></li>
      <li><a href="chlava3.html" target="main" rel="noopener">Chapter 3</a></li>
    </ul>
  </nav>
</body>
</html>
In the links, we indicated the target of the page output – a frame called main. target="main".
Adding CSS styles
To design a website, and in some cases to make its elements dynamic, it is necessary to use cascading style sheets.
First, create a document to store styles – a file called style.css– and place it in the files folder.
To connect the created style file to all pages of the site, you need to place a link to this file in the code of all pages, except for the file with the frame structure ( index.html ):
<!DOCTYPE html>
<html lang="en">
<head>
    <meta charset="UTF-8">
    <meta name="viewport" content="width=device-width, initial-scale=1.0">
    <title>Document Title</title>
    <link rel="stylesheet" type="text/css" href="files/style.css">
</head>
<body>

    <!-- Main content goes here -->

</body>
</html>
To add tag styling rules, please refer to our site’s CSS tutorials.
Explore More IT Terms
#
- Using an integrating factor
- Equations in total differentials
- Bernoulli's equation
- Linear differential equations of the first order
- 10 Mixed C++ Challenges to Test Your Skills
- 11 Tricky Non-Technical Questions to Ask in a Recruiting Interview
- 50 Terms Every Programmer Should Know
- 52 Java Thread Interview Questions
- 7 Levels of Using the Zip Function in Python
- 7 Python Code Bugs You Need to Fix
- 70+ Free Resources for Learning Programming
A
- A Comprehensive Guide to HTML and CSS
- A Comprehensive Guide to MODX CMS
- A computer science question tests your ability to work with IP addresses and network masks
- A Guide to SQL Query Formatting for Beginners
- A/B testing
- Abstract Data Type (ADT)
- AES Encryption Algorithm: How It Works and Where It's Used
- Agile
- Algorithm
- Algorithm Analysis
- Algorithm Complexity-Key Points
- Algorithm complexity: deep parsing O(log n)
- Algorithm vs. Program
- Algorithms and Data Structures in C#
- An overview of the C # programming language
- An overview of the Python programming language
- Anaconda Python
- Analysis of graphs and adjacency matrices question
- Android
- Android App Bundle
- Android SDK
- Angular
- Ansible
- Apache
- Apache Airflow
- Apache Kafka
- Apache Tomcat
- App Store
- AppCode
- Applications of microcontrollers: From simple circuits in electronics to complex systems
- Applications of the derivative
- Arduino: How to Program It: Basics for Beginners
- Array-based stack
- ArrayList
- ASCII
- ASP.NET
- Assembly Language Lessons
B
C
- C++ Lessons
- Cache
- Calculating Memory Capacity
- Character sets and encodings
- Characteristics of a good Algorithm
- Circular singly linked list
- Coding Tests with Answers
- Combinational Circuits Solved Questions
- Compiler
- Complexity of algorithms-Tutorial
- Computer Science Fundamentals Test with Answers (47 questions)
- Computer science tests with answers (More than 100 Questions)
- Constants
- Creating a Table in HTML
- Creating Forms in HTML
- Creating Lists
- Cybernetics and informatics
- Cycles
D
- Data Analytics: applications of data analysis in companies
- Data Engineer - Who is it, what does a data engineer do, and an overview of the profession
- Data modeling: what it is, types, and process steps.
- Data preprocessing: a complete guide for beginners and professionals.
- Data structure
- Data Structures and Algorithms (DSA)
- Data types vs. Data structures
- Database Tests with Answers
- Deep Learning
- Defining Aliases
- Defining Arrays
- Deque
- Detailed articles and tutorials on PHP
- Developing a Website from Scratch
- Differential Equations
- Differentiation of functions
- Digital data: understand the importance of this asset for businesses.
- Double integrals
- Doubly linked lists
- DSA Tutorial
E
F
G
H
- Handling errors and exceptions
- Heads or Tails? How Probability Theory Is Used in IT
- History of the development of computer science
- Homogeneous equations
- Homogeneous vs. non-homogeneous structures
- How to effectively organize your workflow
- How to Learn Java: Tips for Beginner Developers
- How to Learn PHP: A Beginner's Guide
- How to Use S3 Storage in Kubernetes with CSI
- HTML
- HTML and CSS: Definition, Application, and Operating Principles
- HTML and CSS. Layout from Scratch: What to Learn, Where to Learn, and How Long Will It Take?
- HTML Frame Structure
- HTML Link Formatting
- HTML Quizzes with Answers
I
- if..else construction
- Infinite sequences and series
- Information properties
- Inheritance in Java: A Complete Guide to Principles and Implementation
- Inserting an Image
- Integration of functions
- Interactive Python Tutorial – Learn Programming from Scratch
- Interpreter
- Interview Problem: Finding a Deleted Element in O(N)
- Interview Scare: The FizzBuzz Challenge
- Introduction to C++
- Introduction to Machine Learning
- Introduction to Networking | Network Fundamentals Part 1
- Introduction to Number Systems (Binary, Octal, Hexadecimal) | Math for CS Foundations #1
- IT Specialist Resume (CV)
J
K
L
M
- Machine Learning
- Machine Learning Basic Tool: NumPy
- Machine Learning Basic Tool: Pandas
- Machine Learning Mathematics
- Mathematics for programmers: what is really needed?
- MD5 encryption algorithm: What is it and why is it needed?
- Microcontroller and Microprocessor - what's the difference?
- ML Engineer: Who They Are, What They Do, How Much They Earn, and How to Become a Neural Network Specialist
- Monte Carlo Simulation: How It Works and What It's For
O
P
- PHP lessons
- Private DNS server and its configuration
- Program code
- Programmer's Dictionary
- Programming
- Programming with pseudocode
- Python Code Formatting Guide: PEP8
- Python for data analysis: how to do it and main libraries
- Python Lessons
- Python Superstar: 5 Ways to Use the * Operator
- Python vs. Julia: Should You Replace Python with Julia?
R
S
- SFML Graphics Library Tutorials
- Sorting Algorithms in Programming: Types, Descriptions, and Comparisons
- SQL commands: see what they are, what the main ones are + examples
- SQL Interview Questions and Tasks
- SQL Lessons
- SQL Stored Procedures
- SQL Syntactic Sugar: The COALESCE Function
- Stack
- Start in analytics: Python or R
- Static vs. dynamic data structures
- Statistical analysis: importance for decision making.
- String formatting in Python
- Structure of computer science
- Swift Lessons
- switch/match construct
- Syntax
T
- Terms in programming
- Text and paragraph formatting tags
- The Complete Guide to Bootstrap
- The Complete Guide to JavaScript
- The concept of information and its transmission
- The Future of Python: Key Trends and Insights from Global Researc
- The Infrastructure of Code: A Complete Guide to Repositories for Languages, Frameworks, and Compilers
- The pip package manager in Python
- The role of informatization in the development of society
- Transfers
- Tricky Java Questions Often Asked in Interviews
- Tutorials / Articles
- TypeScript: What It Is and Why Developers Need It
W
- What are databases, and why do they need DBMS and SQL?
- What do Linux distributions consist of?
- What is .NET and what is it used for?
- What is a data structure?
- What is a GPU in a computer, in simple terms?
- What is a quantum computer: 100,500 problems in one second
- What Is an Algorithm?
- What is Arduino: How it Works and the Platform's Capabilities
- What is Big Data? Introduction, Types, Characteristics, and Examples
- What is FizzBuzz Challenge?
- What is Golang and what is it used for?
- What is Haskell and what is it used for?
- What is Kotlin and what is it used for?
- What is Linux? The History of Linux
- What is machine learning, and how does it work?
- What is Power BI: everything about the data analytics software
- What is recursion, recursive and iterative process in programming?
- What is the C++ programming language?
- What is the OSI Model: A Complete Explanation of the Seven Layers and Their Role in Networking
- What's the difference between x86 and ARM processors?
- Where to start learning the C programming language?
- Which Linux distribution should you choose? A Linux distribution overview